- Quick guide -
Refund a payment
Process refunds straight from the app.
Which programming language do you prefer?
| PHP
| Python
|
Use arrow keys or space bar to navigate in the presentation.
Authentication
Verify your identity when communicating with the API by providing a secret key in all your requests.
To submit your credentials, include your key in all pages that use the API:
<?php
\Payplug\Payplug::init(array(
  'secretKey' => 'sk_live_YOUR_PRIVATE_KEY',
  'apiVersion' => 'THE_API_VERSION',
));
payplug.set_secret_key('sk_live_YOUR_PRIVATE_KEY')
API keys start with “sk_”.
They are available in My account, then API Credentials in the PayPlug portal.
Access LIVE and TEST modes using the same endpoint. To switch between modes, simply provide the related secret key to the mode you wish to access.
Take a look at the changelog to know which api version you should use.
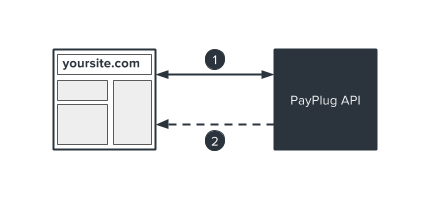
The refund creation process

- Create a refund using the payment ID of the payment you wish to refund.
- PayPlug sends you a confirmation via IPN (instant payment notification).
Processing a refund
Option 1: Full refunds
In order to process a refund, you will need the payment ID of the payment you wish to refund.
The following code shows an example of a full refund:
<?php
$payment_id = 'pay_5iHMDxy4ABR4YBVW4UscIn';
$refund = \Payplug\Refund::create($payment_id);
payment_id = 'pay_5iHMDxy4ABR4YBVW4UscIn'
refund = payplug.Refund.create(payment_id)
Processing a refund
Option 2: Partial refunds
If you only need to refund a portion of the payment, the following in an example of a partial refund:
<?php
$payment_id = 'pay_5iHMDxy4ABR4YBVW4UscIn';
$data = array(
  'amount' => 358,
  'metadata'          => array(
      'customer_id'       => 42710,
      'reason'            => 'The delivery was delayed'
    )
  );
$refund = \Payplug\Refund::create($payment_id, $data);
payment_id = 'pay_5iHMDxy4ABR4YBVW4UscIn'
refund_data = {
  'amount': 358,
  'metadata': {
    'customer_id': 42710,
    'reason': 'The delivery was delayed',
  },
}
refund = payplug.Refund.create(payment_id, **refund_data)
The example above includes metadata useful in tracking the refund.
Confirmation
Option 1: Instant Payment Notification (IPN)
If you specified a notification URL for use with IPN when the payment was created, after the refund is processed, a POST query containing an object corresponding to the refund will be sent to your server using the provided URL.
<?php
$input = file_get_contents('php://input');
try {
  $resource = \Payplug\Notification::treat($input);

  if ($resource->object == "refund")) {
    $refund_id = $resource->id;
    $payment_id = $resource->payment_id;
    $refund_date = $resource->created_at;
    $refund_amount = $resource->amount;
    $refund_data = $resource->metadata[reason];
  }
}
catch (\Payplug\Exception\PayplugException $exception) {
  echo htmlentities($exception);
}
request_body = request.body
try:
  resource = payplug.notifications.treat(request_body)
except payplug.exceptions.PayplugError:
  pass
else:
  if resource.object == 'refund':
    refund_id = str(resource.id)
    payment_id = str(resource.payment_id)
    refund_date = datetime.datetime.fromtimestamp(resource.created_at).strftime('%d/%m/%Y %H:%M:%S')
    refund_amount = str(resource.amount)
    refund_data = resource.metadata['reason']
    pass
The notification URL must be publicly accessible via the internet.
It will not work if you are operating offline or if the page is protected with a firewall or proxy.
Confirmation
If you prefer not to use IPN, you may use the following method to extract payment details:

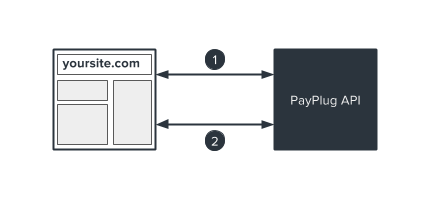
Step one is the same as in the first diagram.
In step two, make an API call using the payment ID and the refund ID:
<?php
$paymentId  = 'pay_5iHMDxy4ABR4YBVW4UscIn';
$refundId   = 're_3NxGqPfSGMHQgLSZH0Mv3B';
$refund = \Payplug\Refund::retrieve($paymentId, $refundId);
payment_id = 'pay_5iHMDxy4ABR4YBVW4UscIn'
refund_id = 're_3NxGqPfSGMHQgLSZH0Mv3B'
refund = payplug.Refund.retrieve(payment_id, refund_id)
Metadata allow you to include additional information when processing payments or refunds.
{
  "metadata": {
    "transaction_id": "tsct_201506023456",
    "customer_id": 58790,
    "product_id": "ts_blk_00234",
    "shipping": "The delivery was delayed"
  }
}
You can add up to ten keys. Names cannot exceed twenty (20) characters,
and stored content cannot exceed five hundred (500) characters.


