
Integrated Payments
Integrated Payments allows you to provide your customer with a payment form directly integrated on your website. This will prevent them from being redirected to an external payment page and therefore will improve their shopping experience.
Moreover, you will not be collecting their card data yourself as the form inputs are located within iframes hosted by PayPlug.
Finally, you will need to use the framework included in the Integrated Payments JS library (integratedpayments.js) to insert, customize, and interact with the form fields.
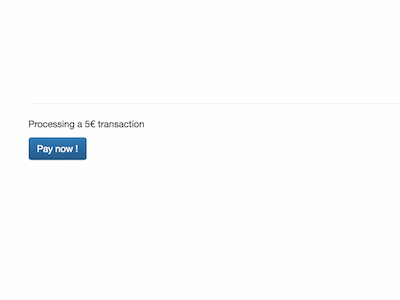
Integrated Payments demo
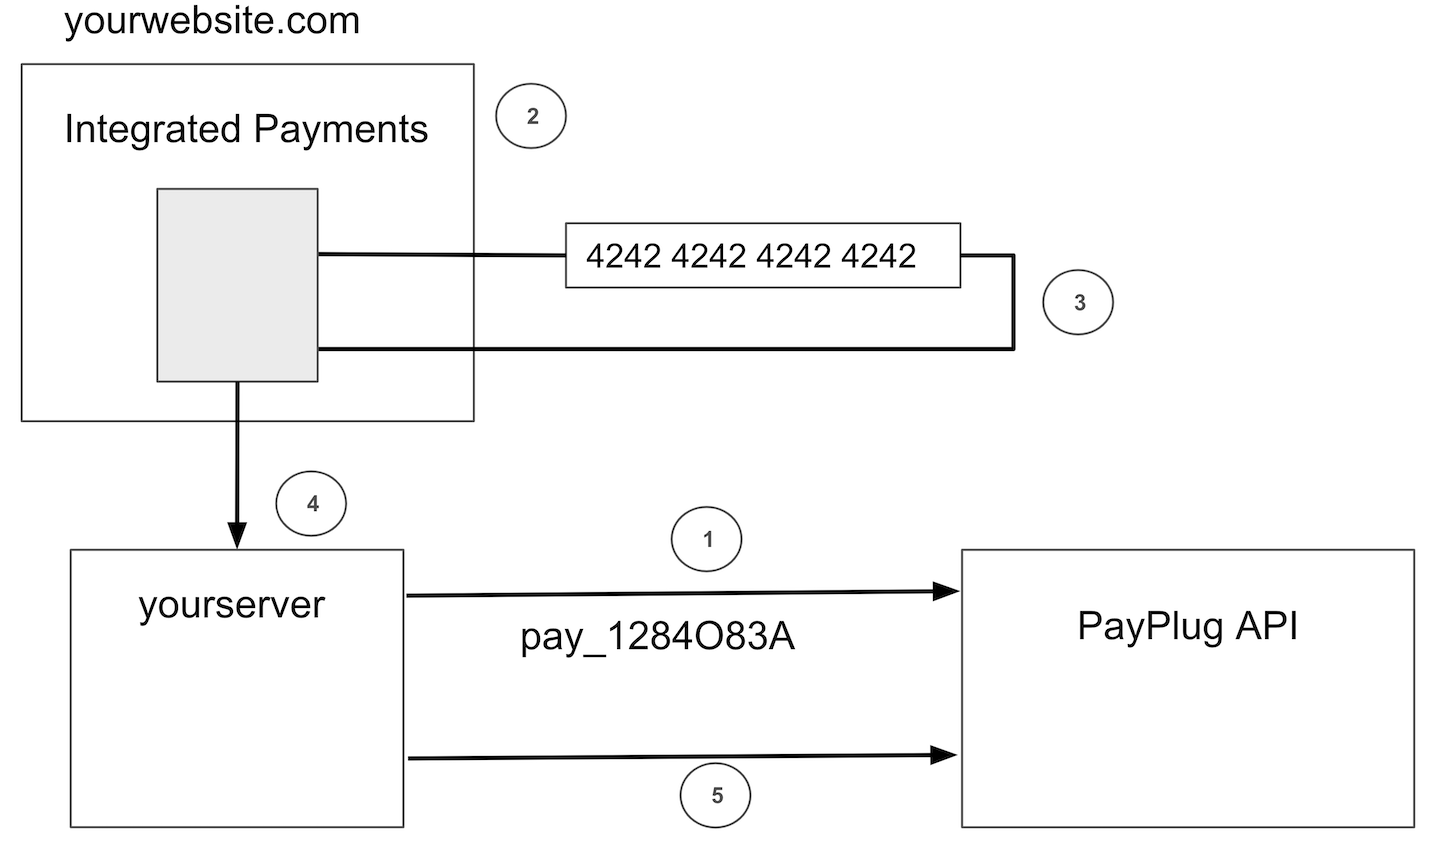
Integrated Payments workflow
Some requirements before starting the integration:
- Security: Your website must be served over HTTPS
- Compliance: You need to provide a PCI DSS attestation.
Stages of the process:
- Create a payment for Integrated Payment
- Build your payment form
- Call the pay method to process the payment
- Validate your order on your server
- Check the payment status from your server by calling our Rest API.
With Integrated payments you can also:
- Handle one page checkouts
- Manage 3DS as you want
- Customize your payment form
- Oversee the scheme choice
Cannot wait to learn more about IntegratedPayment?
Go directly check our full example!
Security
To host your own payment page, you need to follow some security rules.
Use TLS
Make sure all the traffic between your server and your customer’s browser is encrypted.
- Deactivate SSLv3, TLS 1.0, TLS 1.1 from your server.
- Use TLS v1.2 or more to serve all your web pages.
If you want to test your website security, use the following tools:
- Qualys SSL Server Test, a minimum grade of B is highly recommended.
- Digicert Help.
- SSL-Checker from sslshopper.
PCI DSS
Your website must comply with PCI DSS requirements to host your own payment page.
You can complete the PCI DSS Self-Assessment Questionnaire (SAQ) to evaluate if your services are PCI DSS compliant.
To integrate Integrated Payments, you need at least a grade A-EP on your SAQ or your Report Of Compliance (ROC).
You will need to share these details with the PayPlug risk team every year.
Do not hesitate to check the PCI-DSS website if you need more information.
Useful Resources
Here is a small list of very useful articles about server security:
- Mozilla Wiki - Security/Server Side TLS.
- Mozilla SSL Configuration Generator.
- OWASP - Top 10.
- SSL Certificate Installation Instructions & Tutorials.
- PCI SSC Data Security Standards Overview.
Create a payment
<?php
$payment = \Payplug\Payment::create(array(
 'amount'           => 3300,
 'currency'         => 'EUR',
 'integration'      => 'INTEGRATED_PAYMENT',
 ...
));
To use the integrated payments feature, you need to create a payment and set the integration parameter to "INTEGRATED_PAYMENT" and without hosted_payment.cancel_url. For more information report to Payments API.
Build your payment form
<!-- Load the `Integrated Payments` library in your page. -->
<script type="text/javascript" src="https://cdn.payplug.com/js/integrated-payment/v1/index.js"></script>
<!-- Set up a form with your divs -->
<form id="my-payment-form">
    <div id="cardholder-input-container"></div>
    <div id="pan-input-container"></div>
    <div id="cvv-input-container"></div>
    <div id="exp-input-container"></div>
    <button id="paid" type="submit">Payer</button>
</form>
// Create an instance of IntegratedPayment
const integratedPayment = new Payplug.IntegratedPayment(
    document.querySelector('#my-payment-form')  // A reference to your form
);
// Add each payments fields
const cardholder = integratedPayment.cardHolder(document.querySelector('#cardholder-input-container'));
const pan = integratedPayment.cardNumber(document.querySelector('#pan-input-container'));
const cvv = integratedPayment.cvv(document.querySelector('#cvv-input-container'));
const exp = integratedPayment.expiration(document.querySelector('#exp-input-container'));
You need to create some containers by using <div> tags in order to receive secured elements managed by Integrated Payments.
Just follow the following steps:
- Load the
Integrated Paymentslibrary in your page. - Set up a
<form>in your DOM, with some<div>for PAN, CVV, etc. - Create an instance of
IntegratedPayment. If needed you can specify to create it intest_modeby setting the associated boolean parameter in the constructor to true. - Instantiate each hosted field.
You’re all set ! Customers can now fill in Payplug hosted fields with their card details and validate their payment form. You are able to listen to the submit event to call the pay method.
Call the pay method
We advise you to call the pay() method when the user submits the payment form or validate their order. For more information, go check the pay method in the Integrated Payments reference.
// Handle your form submission with simple payment page
document.querySelector('#my-payment-form').addEventListener('submit', (event) => {
    // Cancel default form submission
    event.preventDefault();

    // Get Scheme
    const e = document.querySelector("#my-payment-form");
    const scheme = e.elements['scheme'].value;
    // Trigger the Integrated Payments attempt with the payment ID
    integratedPayment.pay(payment.id, scheme);
});
- If you want to create a simple payment page, you have to call our Rest API before creating your form. Then you can use the
payment_idparameter received in the response to call thepay()method. - If you want to create a one-page checkout go check the one-page checkout section.
Validate your order
integratedPayment.onCompleted((event) => {
    if(event.error) {
        // manage the error
        return;
    }
    // Implement your own retrieve function from back end
    retrievePaymentStatusFromBackEnd(event.token);
});
Call PayPlug API from your back-end to receive the payment status and then validate the order.
You can use the onCompleted() method on an instance of IntegratedPayment to register a callback. It will be called with the payment_id (which is in event.token) once a payment has been completed . We advise that you use this callback to synchronize and retrieve the payment status from your backend.
Check the payment status
<?php
$payment = \Payplug\Payment::retrieve('pay_5iHMDxy4ABR4YBVW4UscIn');
To check the payment status, use the API to Retrieve a payment.
Handle one-page checkouts
You may want to build the payment form without having created the payment yet. For example in the case of a one-page checkout, the payment form is displayed on the same page as the billing and shipping details which are recommended parameters to create the payment in the first place.
The implementation steps are as follow:
Setup your form
<!-- Set up a form with 5 divs -->
<form id="my-payment-form">
    <div id="cardholder-input-container"></div>
    <div id="pan-input-container"></div>
    <div id="cvv-input-container"></div>
    <div id="exp-input-container"></div>
    <button id="paid" type="submit">Payer</button>
</form>
Set up a <form> in your DOM, with <div> tags for the PAN, CVV, expiration date and card holder name.
Instantiate IntegratedPayment and its associated fields
// Create an instance of IntegratedPayment
const integratedPayment = new Payplug.IntegratedPayment();
// Add each payments fields
const cholder = integratedPayment.cardHolder(document.querySelector('#cardholder-input-container'));
const pan = integratedPayment.cardNumber(document.querySelector('#pan-input-container'));
const cvv = integratedPayment.cvv(document.querySelector('#cvv-input-container'));
const exp = integratedPayment.expiration(document.querySelector('#exp-input-container'));
...
a. Create an instance of IntegratedPayment.
b. Instantiate each hosted field.
Handle the submission
// Handle your form submission
document.querySelector('#my-payment-form').addEventListener('submit', (event) => {
  // Cancel default form submission
  event.preventDefault();

  integratedPayment.validateForm();
});

// Listen to the validateForm Event
integratedPayment.onValidateForm(({isFormValid}) => {
  // Form is valid, you can proceed with transaction
  if (isFormValid) {
    // Create payment object on your back-end
    createPaymentOnBackEnd((paymentObject) => {
      // Get Scheme
      const e = document.querySelector("#my-payment-form");
      const scheme = e.elements['scheme'].value;
      // Trigger the Integrated Payments attempt with the payment ID
      integratedPayment.pay(paymentObject.id, scheme);
    });
  }
});
Handle the form submission in your client-side code.
On submission:
a. Create a payment in your back-end using our Payments API and retrieve its id.
b. Call the pay() method on the IntegratedPayment instance with the payment ID to trigger the payment attempt.
OR
a. Create a payment in your back-end using our Payments API and retrieve its id.
b. Validate the form before submitting data to your API.
c. Call the pay() method on the IntegratedPayment instance with the payment ID to trigger the payment attempt.
Manage 3DS
We offer three options to handle 3DS:
- Lightbox (default behavior)
- Redirection
- Custom 3DS handling
You can now choose how you want to handle the 3DS protocol with setDisplayMode3ds() method.
The onCompleted() callback will only be fired once the 3DS validation has been attempted.
You can use the onBefore3ds() method if you want to register a callback to be called just before the 3DS step begins.
Lightbox
integratedPayment.onBefore3ds(() => {
    // Anything you want to do before the customer will be redirected to the 3DS screen.
})
integratedPayment.setDisplayMode3ds(Payplug.DisplayMode3ds.LIGHTBOX);
Redirection
integratedPayment.onBefore3ds(() => {
    // Anything you want to do before the customer will be redirected to the 3DS screen.
})
integratedPayment.setDisplayMode3ds(Payplug.DisplayMode3ds.REDIRECT);
Set the 3DS display mode to Payplug.DisplayMode3ds.REDIRECT.
In this mode, your user will be fully redirected to the 3DS validation page before being redirected to the return_url that you would have defined while creating your payment with our Rest API.
Custom 3DS handling
integratedPayment.onPerform3ds((event) => {
    // Handle 3DS on your side. You'll need the 3DS URL
    handle3ds(event.url3ds);
});
integratedPayment.setDisplayMode3ds(Payplug.DisplayMode3ds.CUSTOM);
Set the 3DS display mode to Payplug.DisplayMode3ds.CUSTOM
If you decide to handle the 3DS protocol yourself it’s your responsibility to lead the customer to the url3ds page sending in onPerform3ds callback. See the onPerform3ds reference to have a complete reference.
Customize your payment form
Customizing input styles
integratedPayment.cardNumber(
  document.querySelector('#pan-input-container'),
  {
    default: {
      color:'#444',
    },
    invalid: {
      color: 'red',
    },
    placeholder: '123',
  }
);
You do not have control over the DOM as it belongs to PayPlug therefore you cannot directly style the card data inputs. However, the Integrated Payments library offers an interface to style them.
All the following methods IntegratedPayment.cardHolder, IntegratedPayment.cardNumber, IntegratedPayment.cvv, IntegratedPayment.expiration, IntegratedPayment.expirationMonth and IntegratedPayment.expirationYear accept an optional style argument which allows you to style each input individually. See the IntegratedPayment.<element> create elements methods for all the available styling options.
Interacting with inputs
const pan = integratedPayment.cardNumber(
  document.querySelector('#pan-input-container')
  );

pan.onChange((event) => {
  if (!event.valid) {
    // The PAN number is not a valid PAN number.
    handleInvalidPANNumber();
  }
});
All the following methods IntegratedPayment.cardHolder, IntegratedPayment.cardNumber, IntegratedPayment.cvv, IntegratedPayment.expiration, IntegratedPayment.expirationMonth and IntegratedPayment.expirationYear return an instance of Payplug.IntegratedPaymentElement that you can use to interact with the inputs.
- You can call the methods
focus(),blur(), andclear()on the elements. - You can register callbacks to listen to element events with the methods
onReady(),onChange(),onFocus(),onBlur(),onClick().
Scheme choice
<!-- Set up a form with 5 divs -->
<form id="my-payment-form">
    <div id="scheme"></div>
    <div id="cardholder-input-container"></div>
    <div id="pan-input-container"></div>
    <div id="cvv-input-container"></div>
    <div id="exp-input-container"></div>
    <button id="paid" type="submit">Payer</button>
</form>
// Instantiate schemes
const schemeElement = document.querySelector('#scheme');
const schemes = integratedPayment.getSupportedSchemes();
schemes.forEach((scheme, id) =>
{
    const radio = document.createElement('input');
    radio.type = 'radio';
    radio.name = 'scheme';
    radio.id = scheme.name;
    radio.value = scheme.id;
    if(scheme.id === 0)
        radio.checked = true;
    schemeElement.appendChild(radio);

    //Add logo scheme or text
    const elmt = document.createElement('img');
    elmt.src = scheme.iconUrl;
    elmt.style.width = '26px';
    elmt.style.height = '21px';
    elmt.title = scheme.title;
    elmt.alt = scheme.title;
    schemeElement.appendChild(elmt);
});
Some countries ask merchants to offer their customers the possibility to choose which scheme to use to process their card payments.
It is a legal requirement that Integrated Payments covers through the scheme parameter of the pay method. In other words:
- Use the scheme chosen by your customer.
- If no scheme is chosen, let PayPlug choose the best scheme (or choose it yourself).
If needed, you can call the getSupportedSchemes() method. It provides icon URLs and names for each scheme, among others.
Full Example
payment.html:
<!DOCTYPE html>
<html lang="fr">
    <head>
        <title>Integrated Payments Demo</title>
        <script type="text/javascript" src="https://cdn.payplug.com/js/integrated-payment/v1/index.js"></script>
    </head>
    <body>
        <form id="my-payment-form">
            <div id="scheme"></div>
            <div id="cardholder-input-container"></div>
            <div id="pan-input-container"></div>
            <div id="cvv-input-container"></div>
            <div id="exp-input-container"></div>
            <button id="paid" type="submit">Payer</button>
        </form>
        <script src="integrated_demo.js"></script>
    </body>
</html>
integrated_demo.js:
// Create an instance of Integrated Payment
const integratedPayment = new Payplug.IntegratedPayment();

// Add scheme
const schemeElement = document.getElementById('scheme');
const schemes = integratedPayment.getSupportedSchemes();
schemes.forEach((scheme, id) =>
{
    const radio = document.createElement('input');
    radio.type = 'radio';
    radio.name = 'scheme';
    radio.id = scheme.name;
    radio.value = scheme.id;
    if(scheme.id === 0)
        radio.checked = true;
    schemeElement.appendChild(radio);

    //Add logo scheme or text
    const elmt = document.createElement('img');
    elmt.src = scheme.iconUrl;
    elmt.style.width = '26px';
    elmt.style.height = '21px';
    elmt.title = scheme.name;
    elmt.alt = scheme.name;
    schemeElement.appendChild(elmt);
});

// Add card holder field
const cardHolder = integratedPayment.cardHolder(document.getElementById('cardholder-input-container'), {
  default: {
    fontFamily: "sans-serif",
  }
});

// Add each payments fields
const cardNumber = integratedPayment.cardNumber(document.getElementById('pan-input-container'), {
    default: {
        fontFamily: "sans-serif",
    },
    invalid: {
        fontFamily: "sans-serif",
        color: '#FF695E',
    },
});
const cvv = integratedPayment.cvv(document.getElementById('cvv-input-container'), {
    default: {
        fontFamily: "sans-serif",
    },
    invalid: {
        fontFamily: "sans-serif",
        color: '#FF695E',
    },
});
const exp = integratedPayment.expiration(document.getElementById('exp-input-container'), {
    default: {
        fontFamily: "sans-serif",
    },
    invalid: {
        fontFamily: "sans-serif",
        color: '#FF695E',
    },
});

// Handle your form submission
document.getElementById('my-payment-form').addEventListener('submit', (event) => {
    // Cancel default form submission
    event.preventDefault();

   integratedPayment.validateForm();
});

// Listen to the validateForm Event
integratedPayment.onValidateForm(({isFormValid}) => {
  // Form is valid, you can proceed with transaction
  if (isFormValid) {
    // Create payment object on your back-end
    createPaymentOnBackEnd((paymentObject) => {
      // Get Scheme
      const e = document.querySelector("#my-payment-form");
      const scheme = e.elements['scheme'].value;
      // Trigger the Integrated Payments attempt with the payment ID
      integratedPayment.pay(paymentObject.id, scheme);
    });
  }
});

// Implement your own retrieve function from back end
integratedPayment.onCompleted((payment_id) => {
    retrievePaymentStatusFromBackEnd(payment_id);
});
Here is a full example of an Integrated Payments integration.